This course is from edX, scroll down & check “Read More” for more informations.
About this course
Over the past few years, there has been a lot of talk about blockchain and its potential in the enterprise landscape. Today, blockchain is no longer a hype: it has become a reality, and is transforming processes and how enterprises do business, across a wide range of industries.
Hyperledger Sawtooth is an open source project under the Hyperledger umbrella, and works as an enterprise-level blockchain system used for building, deploying, and running distributed ledger applications and networks.
The Hyperledger Sawtooth for Application Developers course starts with the basics of blockchain technology and the concepts of permissioned networks, then describes the important features of Hyperledger Sawtooth.
It includes a sample distributed application, Sawtooth Simple Supply, that is based on a simplified supply chain example. This blockchain application includes a web-app frontend, a transaction processor (the equivalent of a smart contract) for the blockchain business logic, and a custom REST API for communication. Learning how to code this sample application will teach you about important Hyperledger Sawtooth concepts and will help you understand how to create your own enterprise-level Hyperledger Sawtooth application.
The 2019 Technology Industry Innovation conducted by KPMG around the adoption of blockchain technologies suggests that 41 percent of businesses are likely to adopt and implement blockchain into their business operations in the next three years. Another important aspect revealed by this survey is that 48 percent of enterprises believe that blockchain will change the way they conduct and manage their business activities in the near future.
Want to be part of the blockchain revolution? Enroll today and learn all about developing applications with Hyperledger Sawtooth.
What you’ll learn
- Blockchain concepts: blockchain structure and process flow, transactions, blocks, hashes and signing, permissions, and consensus algorithms
- Hyperledger Sawtooth basics
- Principles of application design and development for the Hyperledger Sawtooth platform
- Create a full-featured Hyperledger Sawtooth blockchain application, using the included Sawtooth Simple Supply application
- Run and troubleshoot an application
Syllabus
- Welcome!
- Chapter 1. Blockchain Basics
- Chapter 2. Hyperledger Sawtooth
- Chapter 3. Overview of Application Development
- Chapter 4. Creating an Application: Sawtooth Simple Supply
- Chapter 5. Running the Simple Supply Application
- Conclusions
- Final Exam
Welcome!
Introduction
This course is for a developer who wants to write applications for the Hyperledger Sawtooth enterprise blockchain platform. It starts with the basics of blockchain technology and the concepts of permissioned networks, then describes the important features of Sawtooth.
This course includes an example distributed application, Sawtooth Simple Supply, that is based on a simplified supply-chain example. This application includes a web-app front end, a transaction processor (the equivalent of a smart contract) for the blockchain business logic, and a custom REST API for communication. Learning how to code this sample application will teach you about important Sawtooth concepts and will help you understand how to create your own enterprise-level Sawtooth application.
This course requires programming experience with Python and JavaScript, or similar languages, as well as general familiarity with protocol buffers (protobufs). It is also helpful, though not required, to understand the basics of the ZeroMQ (ZMQ) messaging library. The custom REST API in this course uses ZMQ to communicate with the validator.
Chapter 1. Blockchain Basics
Introduction and Learning Objectives
This chapter introduces you to general blockchain concepts, such as a distributed ledger, transactions, blocks, and consensus.
By the end of this chapter, you should be able to:
- Define what a blockchain is
- Define what a transaction is
- Explain how blockchain works
- Define what cryptographic security is
- Distinguish between different types of blockchain permissions
- Define what consensus is
- Discuss when not to use blockchain.
What Is a Blockchain?
A blockchain is an append-only database of transactions that is distributed to all participants in a blockchain network. There is no owner, administrator, or centralized data storage. Participants do not necessarily belong to the same enterprise or organization.
Another term for blockchain is distributed ledger, because the database can be thought of an electronic ledger of transactions (state changes) to the data. This distributed ledger is:
- Shared
Each participant has a copy of the database that is demonstrably identical to all other copies in the blockchain network. - Auditable
The blockchain provides an immutable (unalterable) history of all transactions that uses block hashes to detect and prevent attempts to alter the history. - Secure
All changes are performed by transactions that are signed by known participants. Cryptographic and signing mechanisms provide additional security for the transactions on the blockchain.
- Shared
These features work together with a consensus mechanism to provide “adversarial trust” among all participants in a blockchain network.
For more information, see Wikipedia’s definition of blockchain.
What Is a Transaction?
A transaction is a change to the shared state of the blockchain database. For example:
- Transferring an asset, such as spending cryptocurrency or earning frequent-flyer points
- Changing an item’s location when tracking provenance on a supply chain
- Updating personal data, such as patient information in an electronic medical record.
Transactions are gathered into blocks, with one or more transactions per block.
How Does a Blockchain Work?
You can think of a blockchain as a series of state changes, or log of transactions, that affect the state of the data on a shared distributed ledger. Each block on the blockchain contains transaction data and a header with a timestamp, signer, and hash value.
The hash value is a cryptographic signature or digital fingerprint that uniquely identifies the data in that block, as well as the block’s position in the blockchain. Each block’s hash includes the hash value of the previous block, which makes it very difficult for a malicious actor to change a previous block. Importantly, the hash algorithm takes an input string of any length and produces fixed-length output. Common blockchain hash algorithms include RIPEMD and SHA-2 (such as SHA256 and SHA512).
A blockchain starts with a genesis block. Depending on the blockchain platform, the first block could be empty (except for its hash value) or contain initial settings for the blockchain.

Retrieved from the Hyperledger’s GitHub
Blockchain Workflow
This picture shows the general workflow for adding new data (a transaction) to the blockchain.
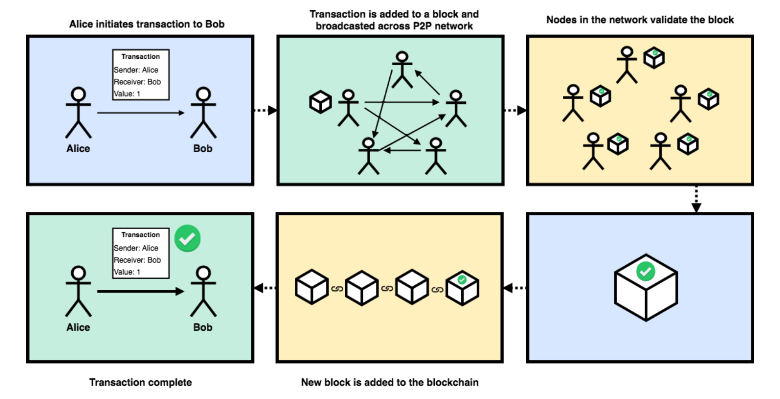
Retrieved from the Hyperledger’s GitHub
Cryptographic Security
Blockchains commonly use public key cryptography to identify legitimate participants and to make sure that malicious users or systems cannot insert bad data or modify the blockchain history.
Public key cryptography uses a pair of keys, a public key and a private key, to identify participants and sign transactions. The public key is available on the network and the private key is kept secret. Together, the two keys provide a secure digital signature that identifies the source of each transaction.
Many blockchain platforms use the Elliptic Curve Digital Signature Algorithm (ECDSA) for public-private keys. Sawtooth uses the ECDSA standard algorithm with secp256k1 curve for signing.
For more information, see the following articles “How Does Blockchain Use Public Key Cryptography” by Toshendra Kumar Sharma and “ECDSA: The Digital Signature Algorithm of a Better Internet” by Nick Sullivan.
Blockchain Permissions
Blockchain networks have the following types of general permissions:
A public blockchain has no restrictions on participation. It allows anyone to join and submit transactions. A signing mechanism, such as public/private keys, identifies each submitter. Ethereum and Bitcoin are examples of public blockchains.
A consortium blockchain is partly private or decentralized. It restricts which nodes can join the network, and can further control which nodes can participate in consensus. However, any participant can submit signed transactions. This network type supports policy-based transaction permissions. For example, Quorum is an Ethereum-powered consortium blockchain that is intended for use by banking and financial industries.
A private blockchain is “permissioned” with access control features. It can have separate controls to restrict who can join, submit transactions, and participate in consensus. This network type supports policy-based transaction permissions. In addition, a private blockchain:
- Specifies the type of transactions that “transactors” can sign
- Restricts “address space access” to a limited set of “transactors”
- Supports policy-based transaction permissioning.
Examples of private blockchain platforms include Hyperledger Fabric and Hyperledger Sawtooth.
For more information, see the following article “Blockchain: The Invisible Technology That’s Changing the World” by Rob Marvin.
Consensus
A blockchain network uses consensus to determine whether a block is valid and should be added to the blockchain. The consensus algorithm determines how the participants decide and how many participants must agree. Types of consensus include:
- Practical Byzantine Fault Tolerance (PBFT), where participants elect a leader to validate transactions. As long as malicious participants are less than 50% of the network, they are overruled by the other participants.
- Proof of Work (PoW), a lottery-like system where the participant who finishes a computational task first (such as solving a cryptographic puzzle) is chosen to publish a block. Bitcoin uses Proof of Work consensus.
- Proof of Stake (PoS), another lottery-like system that requires a stake (such cryptocurrency or computational power). As each participant votes on whether a block is valid, the vote is weighted by the size of the participant’s stake.
- Proof of Elapsed Time (PoET) was introduced in Hyperledger Sawtooth. This type of consensus uses random wait times that are generated from a trusted source. The wait time determines who can propose and publish blocks. The participant with the shortest wait time wins the right to validate the block. PoET consensus improves energy use and resource consumption as compared to PoW or PoS consensus.
For more information, see the PoET 1.0 Specification in the Sawtooth Documentation, and the following two articles “Consensus in Blockchain Systems. In Short” by Chris Hammerschmidt and “Blockchain Consensus Algorithms – Proof of Anything?” by Jörn Franke.
When Not to Use a Blockchain
Blockchain technology is designed for applications that need a decentralized, distributed database with no central control or owner. Participants can be “mutually distrusting”, such as competitors in the same business space.
The traditional approach is a centralized relational database (RDBMS) under the control of a single managing authority. A centralized RDBMS is appropriate for data with a single owner (such as a corporation or government entity) where all contributors are trusted.
Performance is another issue. A blockchain platform is designed for security and decentralization, but not necessarily speed. For example, traditional stock market transactions must occur at a much faster rate than is possible on current blockchain platforms, where each participant must process every transaction.
For more information, see the “Blockchain versus Traditional Databases” article by Shaan Ray.
Summary
This chapter described the important features of blockchain technology, including blockchain structure, transactions and blocks, cryptographic security (hashing and signing), types of blockchain networks, and consensus.
The next chapter describes the key concepts of Hyperledger Sawtooth.

Walker Evans, Detail of Mooring Chains, New Bedford, Massachusetts (fragment)
J. Paul Getty Museum
Digital image courtesy of the Getty’s Open Content Program
Retrieved from the Hyperledger’s GitHub
Chapter 2. Hyperledger Sawtooth
Introduction and Learning Objectives
This chapter introduces you to Hyperledger Sawtooth, an enterprise-level blockchain platform.
By the end of this chapter, you should be able to:
- Explain what the Hyperledger project is
- Define what Hyperledger Sawtooth is
- Discuss Sawtooth features
- Identify and describe Sawtooth architecture components
- Identify and describe Sawtooth application components
- Describe the structure of Sawtooth transactions, batches and blocks
- Explain how Sawtooth handles state and addressing
- Explain how Sawtooth handles permissioning and security
- Explain the concept of event subscription.
What Is the Hyperledger Foundation?
The Hyperledger Foundation is,
“an open source collaborative effort created to advance cross-industry blockchain technologies. It is a global collaboration, hosted by the Linux Foundation, including leaders in finance, banking, IoT, supply chain, manufacturing and technology“.
The Hyperledger Foundation focuses on enterprise-grade blockchain projects, including Hyperledger Sawtooth. For more information, see Hyperledger’s website.
What Is Hyperledger Sawtooth?
Hyperledger Sawtooth is an enterprise solution for building, deploying, and running distributed ledgers. It provides a modular and flexible platform for implementing transaction-based updates to shared state (the blockchain) between untrusted participants. Approval to make these updates is coordinated by consensus algorithms.
Sawtooth simplifies blockchain application development by separating the core system from the application domain. Application developers can specify the business rules appropriate for their application, using the language of their choice, without needing to know the underlying design of the core system.
Sawtooth is also highly modular. The Sawtooth architecture allows applications to choose the transaction rules, permissioning, and consensus algorithms that support their unique business needs.
For more information, see the Hyperledger Sawtooth project on hyperledger.org.

Sawtooth Features
Sawtooth has several distinctive features:
Separation between the application level and the core system
Sawtooth’s modular design lets you focus on business rules without needing to know the underlying design of the system. Transaction processors handle the application’s server-side business logic, while validators manage the core functions of verifying transactions and reaching consensus. Transaction rules, permissioning, and consensus settings are handled in the transaction-processing layer.
Global state agreement
Sawtooth offers cryptographically verifiable distributed ledgers with global state agreement, which is an assurance that each node has cryptographically identical copies of the blockchain database.
Dynamic consensus algorithms
Consensus is the process of building agreement among a decentralized group of mutually distrusting participants. Sawtooth isolates consensus from transaction semantics. More importantly, Sawtooth allows different types of consensus on the same blockchain. The consensus is selected during the initial network setup and can be changed on a running blockchain with a transaction. Consensus is modular as it is implemented as a consensus engine in a separate process.
Parallel transaction execution
Most blockchains require serial transaction execution to guarantee consistent ordering at each node on the network. Sawtooth includes an advanced parallel scheduler that splits transactions into parallel flows. Based on the locations in state that are accessed by a transaction, Sawtooth isolates the execution of transactions from one another while maintaining contextual changes.
Multi-language support
Sawtooth allows blockchain applications to be written in any language. Further, it includes SDKs for a variety of languages, including Python, JavaScript, and Go. You can use different languages for client-side and server-side code. The variety of SDKs lets you select the technology and languages that are best for your application.
An event system that supports creating and broadcasting events
Sawtooth applications can:
- Subscribe to blockchain-related events, such as committing a new block or switching to a new fork
- Subscribe to application specific events defined by a transaction family
- Relay information about transaction execution to clients without storing that data in state.
On-chain governance for permissions and configuration settings
Private networks of Sawtooth nodes can be easily deployed with on-chain permissioning. The blockchain stores configuration and permission settings, such as roles and identities, so that all participants in the network can access this information.
Ability to integrate with other blockchain technologies
The Sawtooth Ethereum (Seth) project is an initial proof-of-concept integration between the Hyperledger Sawtooth and Hyperledger Burrow projects. With Seth, EVM smart contracts can be deployed to Sawtooth. This course does not cover Seth, but you can learn more from the Hyperledger blog post “Hello World, Meet Seth (Sawtooth Ethereum)“.
Sawtooth Architecture
Sawtooth separates core blockchain functions from the business logic through the use of transaction processors and client applications.
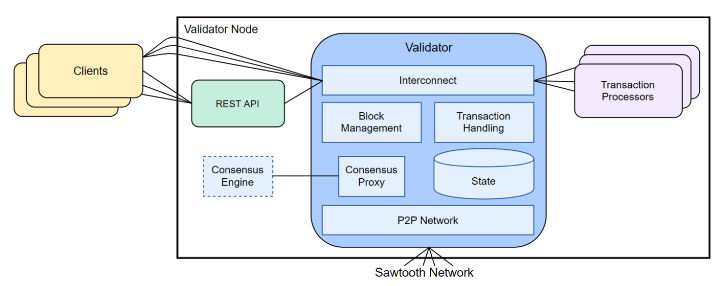
Retrieved from the Hyperledger’s GitHub
Sawtooth core:
- Message handling
- Block validation and publishing
- Global state management
- Modular consensus engine
- Transaction processing (serial or parallel).
Transaction processor:
- Transaction validation
- Block creation
- Transaction rules (business logic).
Client:
- Transaction generation (payload)
- Data display
- Event handling: Reacting to state changes, failure to commit a block, forks, etc.
Sawtooth Network
A Sawtooth network consists of a set of validator nodes. A validator node is a host system (physical computer, virtual machine, or set of Docker containers) that runs a validator process and an identical set of transaction processors.
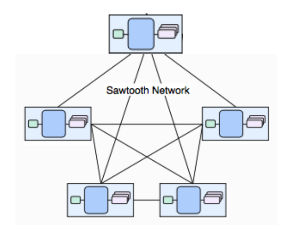
Retrieved from the Hyperledger’s GitHub
The genesis block is created for the first validator node only. It includes on-chain configuration settings, such as the consensus type, that will be available to the new validator nodes once they join the network.
The first validator node on the network has no special meaning, other than being the node that created the genesis block (the first block on the blockchain). Sawtooth has no concept of a “head node” or “master node”. In a Sawtooth network, each node has the same genesis block and treats all other nodes as peers.
Validator
A Sawtooth validator is a core component that does the following:
- Validates batches of transactions
- Combines batches into blocks
- Maintains consensus with the Sawtooth network for adding candidate blocks to each node’s version of the blockchain
- Coordinates communication between clients, transaction processors, and other validator nodes.
Each Sawtooth node runs one validator process. Each validator has its own instance of the blockchain and communicates with the other validators using a peer-to-peer network. The gossip protocol enables communication between the validators.
About Consensus
Sawtooth supports dynamic consensus, which can allow different types of consensus on the same blockchain. Dynamic consensus means the consensus algorithm can be changed for a blockchain without reinitializing the blockchain or restarting Sawtooth. Consensus is modular as each consensus algorithm is implemented as a separate module running as a separate process. Sawtooth currently supports these consensus implementations:
- Proof of Elapsed Time (PoET), a Nakamoto-style consensus algorithm that is designed to be a production-grade protocol capable of supporting large network populations. PoET relies on secure instruction execution to achieve the scaling benefits of a Nakamoto-style consensus algorithm without the power consumption drawbacks of the Proof of Work algorithm.
- PoET simulator, which provides PoET-style consensus on any type of hardware, including a virtualized cloud environment.
- Practical Byzantine Fault Tolerance (PBFT), a leader-based, non-forking consensus algorithm with finality that provides Byzantine Fault Tolerance (BFT). Ideal for smaller, consortium-style networks that do not require open membership.
- Dev mode, a simplified random-leader algorithm that is useful for development and testing.
Sawtooth Applications
Hyperledger Sawtooth separates the application level from the core level, so that an application’s business logic is independent from the core Sawtooth functions.
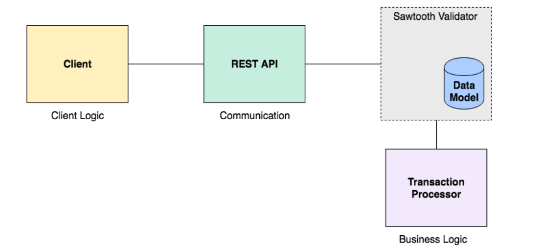
Retrieved from the Hyperledger’s GitHub
An application can be as simple as a single transaction format with associated validation and state-update logic, or as complex as a virtual machine with opcode accounting and bytecode stored in state (on the blockchain) as smart contracts. The application defines the operations or transaction types that are allowed on the blockchain.
Sawtooth includes example applications (called “transaction families” in the Documentation) to serve as models for low-level functions, such as maintaining chain-wide settings and storing on-chain permissions, and for specific applications, such as performance analysis and storing block information.
Transaction processor SDKs are available in multiple languages, including Python, JavaScript, Go, C++, Java, Swift, and Rust, to streamline the creation of new applications.
Sawtooth Application Components
A Sawtooth application includes these components:
- A data model to define valid operations and specify the transaction payload (data for the application).
- A transaction processor to define the business logic for your application. The transaction processor validates batches of transactions and updates state based on the rules defined by the application. The transaction processor runs on each validator node in the Sawtooth network.
- A client to handle the client logic for your application. The client generates and sends transactions (changes for the blockchain) to the validator; the client also displays data. A client can run on a separate system or on the validator node. For example, Sawtooth includes a set of commands that run as a client on each validator node.
- A REST API (optional) to communicate between the client and the transaction processor. An application can use a custom REST API, or Sawtooth provides a REST API that simplifies client development by adapting client-validator communication to standard HTTP/JSON. The REST API runs as a service on the validator node or a separate system.
A Sawtooth application is called a transaction family in the Sawtooth Documentation. A transaction family defines the data model and the set of possible transactions for an application.
The rest of this section describes the structure of Sawtooth transactions, batches, and blocks, explains how Sawtooth handles state and addressing, and summarizes the consensus types.
Transactions, Batches, Blocks, State and Addressing
State changes occur when the Sawtooth validator commits a block containing a batch of transactions. First, a client creates a transaction, wraps it in a batch, and submits the batch to the validator (usually via a REST API). The validator verifies the batch, wraps it in a block, and commits it to the blockchain. At that point, the transactions in the block cause the blockchain state to change.
- Transaction
A single change in the state of the blockchain. Each Sawtooth transaction includes a transaction header that identifies the signer (the client that created the transaction) and a unique transaction ID. - Batch
A transaction is always wrapped inside of a Sawtooth batch, which is the atomic unit of state change. All transactions within a batch are either committed to state together or are not committed at all. Each Sawtooth batch has a batch header that includes the public key of the client who created the batch (often the same as the signer) and the application name (transaction family name) and version. This feature means that a transaction does not have to declare explicit dependencies. Also, transactions from different applications can be combined in a batch. For example, transactions relating to on-chain settings could be batched with application-specific transactions. - Block
A group of Sawtooth batches. A block has a header that includes a timestamp, a signer, and a hash (unique block ID). After a block is committed, the header also identifies the previous block in the blockchain.
- Transaction
Transactions and batches can be signed by different keys. For example, a browser application can sign the transaction and a server-side component can add transactions, then create and sign the batch. This feature allows an application to aggregate transactions from multiple transactors into a single batch operation.
- State
It is the Sawtooth blockchain, represented as a log of all changes that have occurred since the genesis block. Each validator node has its own copy of state in a local database. As blocks are published, each validator updates its state database to reflect the current blockchain status. - Global state (or global state agreement)
It represents the consensus of all participants on the state of the blockchain.
- State
Sawtooth represents blockchain state as a tree on each validator. State is split into application-specific namespaces (addresses), so that each application knows which portion of state it is allowed to change. Also, application developers can define, share, and reuse global state data between applications.
Permissioning and Security
The permissioning design for Hyperledger Sawtooth includes:
- Transactor and batch key permissioning, which controls acceptance of transactions and batches based on signing keys.
- Validator key permissioning, which controls which nodes are allowed to establish connections to the validator network.
- Policy enforcement, a set of DENY and PERMIT rules that can be used to control access to the validator network and determine which transactors can participate on the network.
Sawtooth Events
A Sawtooth application can subscribe to core Sawtooth events and application-specific events that occur on the blockchain, such as a new block being committed or switching to a new fork, then inform clients about the transaction execution without storing that data in state.
An application can also request event catch-up by issuing a catch-up subscription request with a specific block ID. The Sawtooth validator sends data for all events that have occurred after that block was committed.
An event subscription includes the event type, an address (as a specific address, a range, or a pattern), and optional filters for event attributes. Most event subscriptions use filters to focus on the specific events of interest.
Later modules will explain how to implement this functionality in the example Sawtooth Simple Supply application, which includes an event subscriber and a reporting database.
Summary
This chapter described the key concepts of Hyperledger Sawtooth, including the separation of core functionality from the application level, Sawtooth batches, and event subscription.
The next chapter explains the fundamental issues of Sawtooth application design.

Two Chains, Roman
J. Paul Getty Museum
Digital image courtesy of the Getty’s Open Content Program
Retrieved from the Hyperledger’s GitHub
Chapter 3. Overview of Application Development
Introduction and Learning Objectives
This chapter describes application development process for Hyperledger Sawtooth. It explains how to create a Sawtooth application with a transaction processor, client front-end app, a custom REST API, and an event subscriber with an off-chain reporting database for storing state data locally.
By the end of this chapter, you should be able to:
- Summarize Hyperledger Sawtooth core concepts, including Sawtooth applications, transactions, batches, blocks, state and addressing
- Describe Sawtooth application workflow
- Discuss application design considerations including transaction signing, state address format, event subscription and programming language choice.
Sawtooth Applications
This section reviews the important Sawtooth concepts that are needed for application development. You will also learn about event subscription with a reporting database.
As described in the previous module, Sawtooth separates the application level from the core system (the Sawtooth validator).

Retrieved from the Hyperledger’s GitHub
The components of a Sawtooth application include:
- A client that handles the front-end logic for your application. The client structures (serializes) the transaction data, which is also called the payload. Then the client wraps the transaction payload in a Sawtooth batch and submits it to the validator.
- A transaction processor that defines the server-side business logic for your application. The transaction processor decodes payload data and uses an apply function to make state changes.
- An optional REST API or RESTful service to communicate between the client and validator. An application can use the standard Sawtooth REST API or provide a custom REST API.
Note: A REST API is optional because the client could use ZeroMQ instead of HTTP/JSON to communicate directly with the validator. This advanced topic is not covered in this course.
Transactions, Batches, and Blocks
Transactions represent changes to blockchain state and are wrapped in batches, which are then wrapped in blocks.
Transaction: A single change in the state of the blockchain. Each Sawtooth transaction is a protocol buffer (protobuf) object that includes a payload, a transaction header, and a header signature derived from signing the transaction header. The transaction header contains the application’s family name and version, plus several other details.
Batch: The wrapper for a set of transactions. All transactions within a Sawtooth batch are either committed to state together or are not committed at all, which makes batches the atomic unit of state change in Sawtooth. Each batch is a protobuf object that contains a list of transactions and a header that includes a signature from the batch creator (often the same as the transaction creator).
Block: A group of Sawtooth batches. A block has a header that includes a timestamp, a signer, and a hash (unique block ID). After a block is committed, the header also identifies the previous block in the blockchain.
Transaction Payload and Header
The transaction payload is used during transaction execution as a way to convey the change that should be applied to state. Only the application processing the transaction will deserialize the payload. To all other components of the system, the payload is just a sequence of bytes.
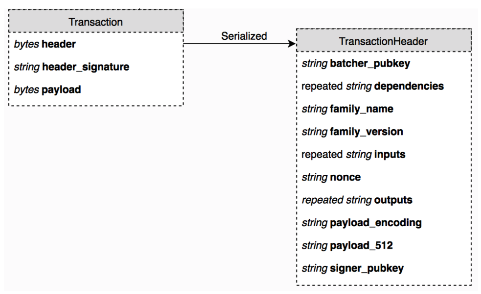
Retrieved from the Hyperledger’s GitHub
In the transaction header, the payload_sha512 field contains a SHA-512 hash of the payload bytes. As part of the header, payload_sha512 is signed and later verified, while the payload field is not. To verify the payload field matches the header, a SHA-512 of the payload field can be compared to payload_sha512.
Batch Structure
Transactions are always wrapped inside of a batch.
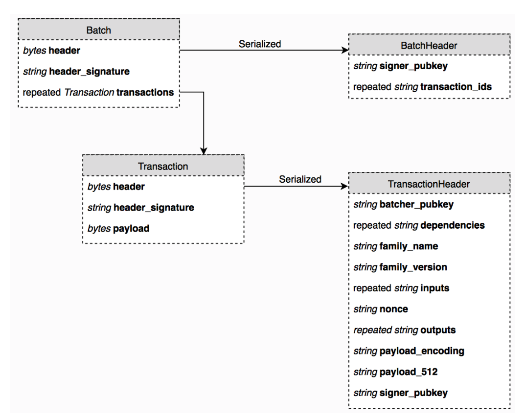
Retrieved from the Hyperledger’s GitHub
State and Addressing
Sawtooth manages the changes to the blockchain state using addresses.
State: The Sawtooth blockchain, as represented as a log of all changes that have occurred since the genesis block. Each validator node has its own copy of state in a local database. As blocks are published, each validator updates its state database to reflect the current blockchain status.
Global state: Represents the consensus of all participants on the state of the blockchain. Also called global state agreement.
Addressing: Sawtooth represents blockchain state as a tree on each validator. State is split into application-specific namespaces (subset of addresses), so that each application knows which portion of state it is allowed to change. Also, application developers can define, share, and reuse global state data between applications.
Application Workflow
This section explains the key concepts of Sawtooth application design.
In Hyperledger Sawtooth, the application workflow looks something like this:
- The user performs an action, such as initializing a value (for example, “set A to 1” )
- The client takes that action, also called the transaction, and does the following:
a. Encodes (serializes) it in a payload, which could be as simple as {“A“: 1}
b. Wraps that payload in a signed transaction, then in a signed batch containing one or more transactions
c. Submits the batch to the validator - The validator confirms that the batch and transaction are valid
- The transaction processor receives the transaction and:
a. Verifies the signer
b. Unwraps the transaction and decodes (deserializes) the payload
c. Verifies that the action is valid (for example, ensures that A can be set to 1)
d. Modifies state in a way that satisfies the action (for example, address …000000a becomes 1) - Later, the client might read that state address and decode it for display to the user.
Application Design Considerations
The core Sawtooth system handles the details of running and validating the blockchain. An application doesn’t need to verify signatures and hashes, validate blocks, or confirm consensus.
As the application developer, you are responsible only for building the client and the transaction processor, plus optional components such as a custom REST API (if you choose not to use the Sawtooth REST API) and an event subscriber.
A Sawtooth application must determine the following items:
- What does the transaction payload look like?
- How is the payload serialized and deserialized?
- What is the format of data that is stored in state?
- Which addresses in state are used to store the application data?
You must decide how to represent your business logic as discrete transaction payloads and determine how those payloads will change state data. Most importantly, you must ensure that the client and transaction processor agree on how to encode payloads and state. The next module provides specific details for the application design details using the example Sawtooth Simple Supply application.
We recommend using an application specification document to record your design decisions before building the application. For examples, see the “Transaction Family (application) Specifications” in the Sawtooth Documentation and the “Sawtooth Simple Supply Application Specification” document on GitHub.
Transaction Signing
Although fetching data from a reporting database works well with typical RESTful HTTP/JSON interfaces, submitting updates to the blockchain using a REST API requires special consideration for the signing model. These two models have been used in the past:
- Client signing model
- Server signing model.
Client Signing Model
The flow for a client signing model is as follows:
- The client builds transactions and batches and signs them using the user’s private key
- The client serializes the batches and submits them to the single POST /batches route on the REST API
- The REST API sends the batches directly to the validator.
Pros:
- User identity is fully verifiable since the transactions are signed locally using the user’s private key
- Even if the server is fully compromised, there is no way to falsify transactions from a certain user.
Cons:
- RESTful endpoints for submitting transactions will not be possible since the server only acts as a middleman, maintaining a connection with and submitting serialized data to the validator
- Each client must implement transaction creation and signing functionality.
This model fully takes advantage of blockchain identity verification, leaving the onus on the user to protect their own private key. Examples of this model include Sawtooth Supply Chain, as well as the Sawtooth REST API.
Server Signing Model
The flow for a server signing model is as follows:
- The client submits update requests as JSON objects to traditional RESTful interfaces
- The server creates and signs transactions based on the submitted JSON
- The server handles batching/serialization and sends the transaction to the validator
Pros:
- The server maintains RESTful interfaces, which means that interacting with the server is no different than if the server was backed by a traditional database.
- The client does not have to handle any signing or transaction creation.
Cons:
- Because the server is in charge of signing all transactions, the identity verification guarantee of blockchain is somewhat compromised.
A naive approach of the server signing model would sign all transactions from a single key owned by the server. This would negate all of the identity verification advantages of blockchain as the server would be the single source of truth, the same as with a traditional database.
This disadvantage can be mitigated by generating a public/private key pair for each user on the server and storing the (encrypted) private key in a key escrow service. The server can then retrieve and decrypt the private key of an authenticated user and sign transactions on their behalf. While this is better than the former approach, it is still only as secure as the server’s security mechanisms. Simple Supply uses this approach, which is described in detail in the following sections. For another example, see Sawtooth Marketplace.
State Address Format
The address scheme for global state is an important part of application design. Sawtooth stores state data for all applications in a single instance of a database (a Merkle-Radix tree) on each validator. Data is stored in leaf nodes, and each node is accessed using an addressing scheme that is composed of 35 bytes, represented as 70 hex characters.
The state is split into namespaces, which allows application developers to define, share, and reuse global state data between transaction processors. The namespace identifies a set of addresses that “belong” to an application.
For more information, see “Global State” section in the Sawtooth Documentation.
A Sawtooth address begins with a namespace prefix of 6 hex characters representing 3 bytes. The rest of the address, 32 bytes represented as 64 hex characters, is defined by the application.

Retrieved from the Hyperledger’s GitHub
The recommended way to construct an address is to use the hex-encoded hash values of the string or strings that make up the address elements. Sawtooth applications often determine the namespace prefix by calculating an SHA256 hash of the application name, then using the first 6 characters, as in this Python example:
prefix = hashlib.sha256(“my_app_name”.encode(‘utf-8’)).hexdigest()[:6]
However, an application can choose to use any arbitrary scheme for the namespace. For example, Sawtooth Settings uses the namespace prefix 000000. For the existing namespace values, see the “Transaction Family (application) Specifications” in the Sawtooth Documentation.
Event Subscription
A Sawtooth application can implement event subscription with an event subscriber and a local reporting database to store state event data. Note that this off-chain reporting database is separate from the state database on each validator node.
A change to the blockchain triggers a Sawtooth event. Events are triggered “on block boundaries”; that is, when a block is committed. Each application can define its own events. By convention, event names include the application name as a prefix. Sawtooth has two core events (identified with the sawtooth prefix):
- sawtooth/commit-block: Contains information about the committed block: the block ID, number, state root hash, and previous block ID
- sawtooth/state-delta: Contains all state changes that occurred for a block at a specific address.
In this model, an event subscription client subscribes to both Sawtooth state-delta and block-commit events, then uses the data reported in these events to maintain a local copy of blockchain state, which allows rapid querying of state data.
The first request for event data specifies the genesis block. An application can also request event catch-up by issuing a catch-up subscription request with a specific block ID. The Sawtooth validator sends data for all events that have occurred after that block was committed.
An event subscription includes the event type, an address (as a specific address, a range, or a pattern), and optional filters for event attributes. Most event subscriptions use filters to focus on the specific events of interest. For more information, see “Subscribing to Events” section in the Sawtooth Documentation.
Programming Language Choice
The Sawtooth platform allows you choose the language or languages for implementing your application components. For example, the Simple Supply application (described in a later chapter) uses JavaScript for the client web app and Python for the transaction processor and REST API.
Sawtooth provides SDKs in multiple languages, including Python, JavaScript, Go, C++, Java, Swift, and Rust. For more information, see the list of available SDKs in the Sawtooth Documentation.
Summary
This chapter described the principles and guidelines for Sawtooth application development.
In the next chapter, you will examine an example application, Sawtooth Simple Supply, while learning the design and coding details that are important for a successful Sawtooth application.

Pierre Cordier, Chimigramme II
J. Paul Getty Museum
Digital image courtesy of the Getty’s Open Content Program
Retrieved from the Hyperledger’s GitHub
Chapter 4. Creating an Application: Sawtooth Simple Supply
Introduction and Learning Objectives
This chapter presents an example application, Sawtooth Simple Supply, that demonstrates the fundamentals of application development. The chapter starts with the design decisions for Simple Supply, then walks you through the process of developing a simple, yet full-stack application.
By the end of this chapter, you should be able to:
- Clone the Simple Supply repository
- Discuss about Simple Supply
- Design the Simple Supply application
- Create the transaction processor
- Create the REST API
- Create the event subscriber
- Test the application
- Create the client.
Cloning the Simple Supply Repository
To get started, clone the Github repository hyperledger/education-sawtooth-simple-supply. This repository contains the code for the Simple Supply example application.
- Open a terminal window and navigate to your projects directory.
- Clone the repository:
$ git clone https://github.com/hyperledger/education-sawtooth-simple-supply.git - Navigate to the project root directory:
$ cd education-sawtooth-simple-supply
As you go through this chapter, you can follow along with the Simple Supply code in this repository.
About Simple Supply
Sawtooth Simple Supply is a basic example of asset transfer with location tracking. It allows users to track the provenance and location of goods as they move through a supply chain.
Sawtooth Simple Supply is a simplified version of Sawtooth Supply Chain, which is a distributed application that traces the provenance and other contextual information of any asset.
Simple Supply includes a client web app, Curator, that tracks artwork loans between museums, galleries, and private owners.
Vincent Van Gogh, Irises
Digital image courtesy of the Getty’s Open Content Program
Retrieved from the Hyperledger’s GitHub
Each participant can add a Sawtooth node to the blockchain network, then register owners and their artwork (including the location). To make a loan, an owner transfers the art and changes its location.
Storing this information on the blockchain means that another client app (not in this simple example) could provide more features such as telling owners whether their loaned art is in transit or has arrived; informing artists where their work is being displayed; or helping art lovers find an exhibit of their favorite paintings.
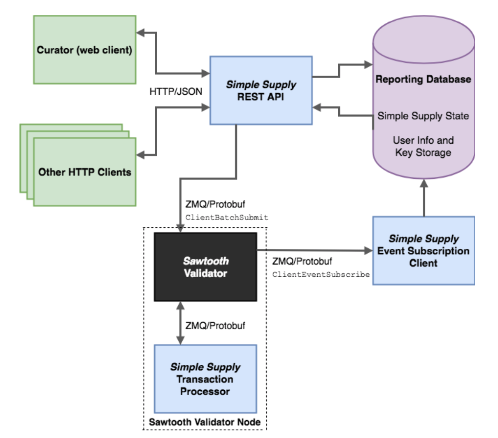
The Simple Supply application includes these components:
- The Simple Supply transaction processor, which interfaces with a Sawtooth validator in order to validate transactions. The transaction processor is written using the Sawtooth Python 3 SDK.
- The Curator client, a lightweight web app that submits requests to register new owners and artwork, transfer artwork to a different owner, and change the artwork’s location. The client then submits these requests as HTTP to the REST API. Curator is written in JavaScript.
- A custom REST API that handles some client functions (such as creating batches and transactions from the requests submitted by Curator) as well as communicating with the validator. The REST API manages user information and public/private key pairs, which are stored in an off-chain reporting database. This REST API is written in Python.
- An event subscriber, which parses Sawtooth events and stores state data in the off-chain reporting database. The event subscriber is written in Python.
Simple Supply Architecture
This architecture diagram shows the communication between the Simple Supply components: Curator web client, custom REST API, event subscriber, reporting database, and Sawtooth validator.
Retrieved from the Hyperledger’s GitHub
The Event Subscriber
The Simple Supply application includes an event subscriber that registers to receive the following Sawtooth events.
- sawtooth/commit-block: Contains information about the committed block: the block ID, number, state root hash, and previous block ID
- sawtooth/state-delta: Contains all state changes that occurred for a block at a specific address
For more information about events, such as defining application-specific events, see the “Events and Transaction Receipts” section in the Sawtooth Documentation.
The event subscriber stores the information in a local (off-chain) reporting database for later use. This allows the Simple Supply REST API to query the reporting database for state data instead of using slower queries to the validator. Simple Supply also uses this PostgreSQL database to store user information such as hashed passwords and encrypted signing keys.
Usage
Clone the Simple Supply repository, then make sure that you have the docker and docker-compose commands installed on your machine. To run the application, navigate to the project’s root directory, then use this command:
docker-compose up
This command starts all Simple Supply components in separate containers.
The available HTTP endpoints are:
- Client: http://localhost:8040
- Simple Supply REST API: http://localhost:8000
- PostgreSQL Adminer: http://localhost:8080
- Sawtooth REST API: http://localhost:8008
License
The Sawtooth Simple Supply software and course material in the course_modules subdirectory is licensed under a Creative Commons Attribution 4.0 International License. You may obtain a copy of the license at: http://creativecommons.org/licenses/by/4.0/.
Designing the Simple Supply Application
Before looking at the Simple Supply code for each component, it is important to consider the application design:
- Business logic: What are Simple Supply’s transaction execution rules?
- Addressing scheme: Which addresses in state are used to store the application data?
- State encoding: What is the format of data that is stored in state?
- Payload encoding: What does the transaction payload look like?
Business Logic
In Simple Supply, an asset is called a record. A record contains a unique identifier and lists containing the history of its owners and location. An agent can own, transfer, and update records. Each agent is associated with a public and private key that is used to sign transactions. Note that the agent object in state does not actually store the private key; instead, the private key is encrypted and stored in the off-chain database.
The transaction actions in Simple Supply are:
- Create agent
- Create record
- Update record (change its geographical location)
- Transfer record.
Later topics show how to implement the ‘create agent’ transaction, as well as any overhead for each of the application components (such as metadata for the transaction processor). The other transactions are similar so aren’t shown in detail in this course.
Addressing Scheme
A Sawtooth address is 35 bytes (70 hex characters). Simple Supply uses a very simple addressing scheme with three parts.

Retrieved from the Hyperledger’s GitHub
Bytes 1-3: The first 6 characters of the hashed application name. The set of addresses that start with these bytes is the application’s namespace. Simple Supply uses the SHA-512 hash of the string simple_supply, as follows:
>>> hashlib.sha512(‘simple_supply’.encode(‘utf-8’)).hexdigest()[:6] ‘212bd8’
Byte 4: Resource type:
- Agent: 00
- Record: 01.
The final 31 bytes are determined by the resource type:
- Agent: The first 62 characters of the hash of its public key
- Record: The first 62 characters of the hash of its identifier.
This addressing scheme allows Simple Supply to quickly determine which type of resource is stored at any address by looking at the fourth byte of the address.
State Encoding
Applications serialize payloads to make the data “opaque” to the core Sawtooth system. The validator sees the data as simply a string of bytes. Only the transaction processor that handles the transaction will deserialize the payload.
When interacting with the blockchain, a transaction processor sets and retrieves state data by making calls against a version of state that the validator provides.
- get_state(address) returns the byte array found at the address
- set_state(address, data) sets the byte array stored at that address.
Likewise, when a client sends a transaction to the validator, it must serialize the payload data.
For this reason, the encoding scheme must be deterministic; serialization and deserialization must always produce the exact same results. Even the slightest difference in the state entities across platforms or executions (such as the keys being in a different order or rounding inconsistencies for floating-point numbers) can break the global state agreement. Avoid data structures that don’t enforce an ordered serialization (such as sets, maps, dicts, or JSON objects). Also take care to avoid data types that may be interpreted differently across platforms.
Simple Supply uses protocol buffers (protobufs) to encode all objects before storing them in state (both payloads and state data. Using protobufs here is convenient because Simple Supply uses protobufs to serialize batches and transactions. Although protobufs don’t fully guarantee determinism, they serialize and deserialize identically for the purposes of Simple Supply. The Simple Supply protobuf messages are in education-sawtooth-simple-supply/protos.
State Data: Agents
An agent is identified by the public key of the user who created the agent. Simple Supply stores the public key on the blockchain. Simple Supply also tracks a user-specified name for the agent, and the time when the agent was registered (when the CreateAgentAction transaction was submitted to the validator). The protobuf message for an agent stored in state is defined in protos/agent.proto:
message Agent {
// The agent’s unique public key
string public_key = 1;
// A human-readable name identifying the agent
string name = 2;
// Approximately when the agent was registered, as a Unix UTC timestamp
uint64 timestamp = 3;
}
State Data: Records
A record is a collection of data about a specific asset that has been registered on the blockchain. A record has a record ID, which is a unique identifier determined by the application or an external resource (such as a serial number or other meaningful data). A record also has time-stamped lists of owners and location updates. See the Record protobuf in protos/record.proto:
message Record {
message Owner {
// Public key of the agent who owns the record
string agent_id = 1;
// Approximately when the owner was updated, as a Unix UTC timestamp
uint64 timestamp = 2;
}
message Location {
// Coordinates are expected to be in millionths of a degree
sint64 latitude = 1;
sint64 longitude = 2;
// Approximately when the location was updated, as a Unix UTC timestamp
uint64 timestamp = 3;
}
// The user-defined natural key which identifies the object in the
// real world (for example a serial number)
string record_id = 1;
// Ordered oldest to newest by timestamp
repeated Owner owners = 2;
repeated Location locations = 3;
}
State Data: Containers
As described in the “Addressing Scheme” section, Simple Supply stores agent and record state entities at addresses based on a hash of the agent’s public key or record’s ID. Because there is no guarantee that the hashes are unique, Simple Supply must handle the case where two unique entities have the same state address.
To solve this problem, Simple Supply actually stores containers at each state address, rather than the entity itself. This approach allows the application to store multiple state entities at a single address.
The data stored at each agent address in state is defined by this message in protos/agent.proto:
message AgentContainer {
repeated Agent entries = 1;
}
The state data for records is defined by a similar message in protos/record.proto.
Payload Encoding
The SimpleSupplyPayload object has six fields: an action tag, a timestamp, and four fields that contain other objects with the data for specific actions. This object is defined in protos/payload.proto:
message SimpleSupplyPayload{
enum Action {
CREATE_AGENT = 0;
CREATE_RECORD = 1;
UPDATE_RECORD = 2;
TRANSFER_RECORD = 3;
}
// Whether the payload contains a create agent, create record,
// update record, or transfer record action
Action action = 1;
// The transaction handler will read from just one of these fields
// according to the action
CreateAgentAction create_agent = 2;
CreateRecordAction create_record = 3;
UpdateRecordAction update_record = 4;
TransferRecordAction transfer_record = 5;
// Approximately when transaction was submitted, as a Unix UTC timestamp
uint64 timestamp = 6;
}
When the client creates a transaction, it puts the UTC time in the timestamp field, chooses the proper enum value for the action field, and fills in the field that corresponds to the action. The other three fields are blank. For example, if the action is CREATE_AGENT, the client fills in the create_agent field. The CreateAgentAction message is defined in protos/payload.proto:
message CreateAgentAction {
// A human-readable name identifying the new agent
string name = 1;
}
Note that the client does not provide the public key for the new agent, even though the key is included in the Agent state entity, because the public key can be read from the signer_public_key field of the transaction header.
This approach means that each user must register as an agent using their own public key. For an application that uses a different registration method (for example, if a manager can create new accounts for subordinates), it might be necessary to add a public_key field to the CreateAgentAction message.
For the other actions, see the “Sawtooth Simple Supply Application Specification“.
Creating the Transaction Processor
When the validator receives a transaction from a client, the validator confirms that the signature is valid, then send the transaction to the transaction processor to be executed.
A transaction processor has two main components:
- The TransactionProcessor class is a generic class for communicating with a validator and routing transaction processing requests to a registered handler. This class uses ZMQ and channels to handle requests concurrently. Each SDK provides an implementation of this class.
- The TransactionHandler class is a base class that defines the business logic for the application. The application extends the TransactionHandler class with application-specific logic.
The handler gets called in two ways:
- With an apply method
- With various transaction processor metadata methods
The Simple Supply transaction processor is defined in processor/simple_supply_tp.
The next section describes apply and its helper functions, which make up the majority of the handler. The metadata, which is used to connect the handler to the processor, is described later.
Implementing the ‘apply’ Method
Transaction processing is done in the apply method and its helper methods. The apply method must:
- Unpack the action data from the transaction
- Determine which action is specified
- Create new values or update existing values in state
The apply method has two arguments:
- transaction holds the action (for example, create a new agent); this argument’s structure resembles the transaction that the validator received, although the transaction header was deserialized before it was sent to the transaction processor; apply uses the following parts:
– transaction.payload: Serialized payload received by the validator
– transaction.header.signer_public_key: Public key used to sign the transaction (which doubles as the ID of the agent sending the transaction). - context holds the blockchain state and has methods for getting and setting values, including get_state and set_state. If everything goes well, the validator’s state will be updated with the new or changed values. If the transaction cannot be executed or is invalid, the handler will return an InvalidTransaction error.
- transaction holds the action (for example, create a new agent); this argument’s structure resembles the transaction that the validator received, although the transaction header was deserialized before it was sent to the transaction processor; apply uses the following parts:
The apply method for Simple Supply is defined in processor/simple_supply_tp/handler.py.
def apply(self, transaction, context):
header = transaction.header
payload = SimpleSupplyPayload(transaction.payload)
state = SimpleSupplyState(context)
if payload.action == payload_pb2.SimpleSupplyPayload.CREATE_AGENT:
_create_agent(
state=state,
public_key=header.signer_public_key,
payload=payload)
elif payload.action == payload_pb2.SimpleSupplyPayload.CREATE_RECORD:
# …
elif payload.action == payload_pb2.SimpleSupplyPayload.TRANSFER_RECORD:
# …
elif payload.action == payload_pb2.SimpleSupplyPayload.UPDATE_RECORD:
# …
else:
raise InvalidTransaction(‘Unhandled action’)
def _create_agent(state, public_key, payload):
if state.get_agent(public_key):
raise InvalidTransaction(‘Agent with the public key {} already exists’.format(public_key))
state.set_agent(
public_key=public_key,
name=payload.data.name,
timestamp=payload.timestamp) # …
The following sections describe how to implement the transaction logic for the “create agent” action.
Decoding the Payload
To keep the application as modular as possible, Simple Supply defines a SimpleSupplyPayload helper class. This class decodes the payload, makes sure that it is properly formatted, and simplifies access to the transaction data. See processor/simple_supply_tp/payload.py.
class SimpleSupplyPayload(object):
def __init__(self, payload):
self._transaction = payload_pb2.SimpleSupplyPayload()
self._transaction.ParseFromString(payload)
@property
def action(self):
return self._transaction.action
@property
def data(self):
if self._transaction.HasField(‘create_agent’) and
self._transaction.action ==
payload_pb2.SimpleSupplyPayload.CREATE_AGENT:
return self._transaction.create_agent
# …
raise InvalidTransaction(‘Action does not match payload data’)
@property
def timestamp(self):
return self._transaction.timestamp
Getting and Setting State
As with the payload, Simple Supply uses a helper class to serialize and deserialize state data. Because all state entities are stored in containers, this helper class also ensures that the get_agent method fetches the right data at the address. The SimpleSupplyState class is defined in processor/simple_supply_tp/state.py.
class SimpleSupplyState(object):
def __init__(self, context, timeout=2):
self._context = context
self._timeout = timeout
def get_agent(self, public_key):
“””Gets the agent associated with the public_key
Args:
public_key (str): The public key of the agent
Returns:
agent_pb2.Agent: Agent with the provided public_key
“””
address = addresser.get_agent_address(public_key)
state_entries = self._context.get_state(
addresses=[address], timeout=self._timeout)
if state_entries:
container = agent_pb2.AgentContainer()
container.ParseFromString(state_entries[0].data)
for agent in container.entries:
if agent.public_key == public_key:
return agent
return None
# …
When updating state, set_agent must either create a new container or reuse an existing container at an address. See processor/simple_supply_tp/state.py.
class SimpleSupplyState(object):
# …
def set_agent(self, public_key, name, timestamp):
“””Creates a new agent in state
Args:
public_key (str): The public key of the agent
name (str): The human-readable name of the agent
timestamp (int): Unix UTC timestamp of when the agent was created
“””
address = addresser.get_agent_address(public_key)
agent = agent_pb2.Agent(
public_key=public_key, name=name, timestamp=timestamp)
container = agent_pb2.AgentContainer()
state_entries = self._context.get_state(
addresses=[address], timeout=self._timeout)
if state_entries:
container.ParseFromString(state_entries[0].data)
container.entries.extend([agent])
data = container.SerializeToString()
updated_state = {}
updated_state[address] = data
self._context.set_state(updated_state, timeout=self._timeout)
Generating Addresses
Because both the client and transaction processor must generate addresses for state entities, it is a good idea to put the address-generation functionality in its own library. In Simple Supply, the addressing library defines the metadata fields and methods for creating an address based on the identifier of a state entity. See addressing/simple_supply_addressing/addresser.py.
FAMILY_NAME = ‘simple_supply’
FAMILY_VERSION = ‘0.1’
NAMESPACE = hashlib.sha512(FAMILY_NAME.encode(‘utf-8’)).hexdigest()[:6]
AGENT_PREFIX = ’00’
RECORD_PREFIX = ’01’
# …
def get_agent_address(public_key):
return NAMESPACE + AGENT_PREFIX + hashlib.sha512(
public_key.encode(‘utf-8’)).hexdigest()[:62]
def get_record_address(record_id):
return NAMESPACE + RECORD_PREFIX + hashlib.sha512(
record_id.encode(‘utf-8’)).hexdigest()[:62]
# …
Setting Metadata
After implementing the transaction logic, Simple Supply needs to set up the SimpleSupplyHandler class and its metadata. The metadata consists of information about what kinds of transactions the transaction processor can handle. This information is read by the validator upon registration of the transaction processor. See processor/simple_supply_tp/handler.py.
class SimpleSupplyHandler(TransactionHandler):
@property
def family_name(self):
return addresser.FAMILY_NAME
@property
def family_versions(self):
return [addresser.FAMILY_VERSION]
@property
def namespaces(self):
return [addresser.NAMESPACE]
def apply(self, transaction, context):
# …
Creating the ‘main’ Method
The final piece of the transaction processor is the main method. This function uses the argparse library to get the validator’s URL and logging preferences (such as verbosity). Simple Supply’s main method is defined in processor/simple_supply_tp/main.py:
def main(args=None):
if args is None:
args = sys.argv[1:]
opts = parse_args(args)
processor = None
try:
init_console_logging(verbose_level=opts.verbose)
processor = TransactionProcessor(url=opts.connect)
handler = SimpleSupplyHandler()
processor.add_handler(handler)
processor.start()
except KeyboardInterrupt:
pass
except Exception as err:
print(“Error: {}”.format(err))
finally:
if processor is not None:
processor.stop()
Creating the REST API
The Simple Supply REST API handles transaction creation and signing logic. This custom REST API has several routes for submitting transaction requests and fetching data for use by a user-facing client application. Simple Supply includes an example lightweight web app called Curator that uses these routes, but you could also use tools like Postman or cURL to make requests to the REST API. For more information, see the specification for the Simple Supply REST API.
Simple Supply’s REST API uses a server-side signing model. For an application that chooses to use the standard Sawtooth REST API with the client-side signing, the client must handle functions such as submitting and signing transaction requests and fetching data.
The Simple Supply REST API is implemented using the aiohttp library, which has a few different classes:
- RouteHandler: Services incoming HTTP requests, handling auth, fetching requested data from the Database, and sending transaction data to the Messenger
- Messenger: Manages the connection to the validator and uses the transaction_creation module to build transactions
- Database: Handles connection to the reporting database.
This section describes how to implement the “create agent” action. The other actions are implemented in a similar way. Refer to the Simple Supply code for details about the “create record”, “update record”, and “transfer record” actions.
Create Agent Workflow
The Simple Supply REST API has the following basic workflow for the “create agent” action:
- Create a new agent using the POST/agents route (enter a name and password)
- Generate a new public/private key pair for the agent
- Encrypt the private key and store it in the auth table in the reporting database, along with the agent’s public key and hashed password.
Note: Key encryption and storage is not a blockchain operation. The Simple Supply client provides this functionality as a convenience for storing private keys. - Use the Messenger class to format the transaction and send it to the validator
- If all operations are successful, the REST API returns an auth token.
Route Handler
The RouteHandler functionality for Create Agent is defined in rest_api/simple_supply_rest_api/route_handler.py:
async def create_agent(self, request):
body = await decode_request(request)
required_fields = [‘name’, ‘password’]
validate_fields(required_fields, body)
public_key, private_key = self._messenger.get_new_key_pair()
await self._messenger.send_create_agent_transaction(
private_key=private_key,
name=body.get(‘name’),
timestamp=get_time())
encrypted_private_key = encrypt_private_key(
request.app[‘aes_key’], public_key, private_key)
hashed_password = hash_password(body.get(‘password’))
await self._database.create_auth_entry(
public_key, encrypted_private_key, hashed_password)
token = generate_auth_token(
request.app[‘secret_key’], public_key)
return json_response({‘authorization’: token})
Generating Keys
To confirm user identity and sign the information sent to the validator, each user needs a 256-bit key. For signing, Sawtooth uses the ECDSA standard algorithm with secp256k1 curve, which means that almost any set of 32 bytes is a valid key. It is fairly simple to generate a valid key using the SDK’s signing module.
A Signer object wraps a private key and provides some convenient methods for signing bytes and getting the private key’s associated public key. For the full signing API, see the Python SDK sawtooth_signing package in the Sawtooth Documentation.
Simple Supply’s REST API contains a simple example showing how to generate a signer; see rest_api/simple_supply_rest_api/messaging.py.
from sawtooth_signing import create_context
from sawtooth_signing import CryptoFactory
context = create_context(‘secp256k1’)
private_key = context.new_random_private_key()
signer = CryptoFactory(context).new_signer(private_key)
IMPORTANT!
With this server-signing model, the private key is the only way a user can prove their identity on the blockchain. A private key MUST be kept secret and secure, because anyone who has a user’s private key can sign transactions on their behalf. Also, there is no way to recover a private key if it is lost. If an application uses the server-signing model, it is critically important to use highly secure methods to store users’ private keys. Note that Simple Supply does not provide an example of secure private key storage.
Messenger
The Messenger component of the Simple Supply REST API handles key generation. It maintains its own private key, as well as generating key pairs for new agents. For the Simple Supply code, see rest_api/simple_supply_rest_api/messaging.py.
class Messenger(object):
def __init__(self, validator_url):
self._connection = Connection(validator_url)
self._context = create_context(‘secp256k1’)
self._crypto_factory = CryptoFactory(self._context)
self._batch_signer = self._crypto_factory.new_signer(
self._context.new_random_private_key())
def open_validator_connection(self):
self._connection.open()
def close_validator_connection(self):
self._connection.close()
def get_new_key_pair(self):
private_key = self._context.new_random_private_key()
public_key = self._context.get_public_key(private_key)
return public_key.as_hex(), private_key.as_hex()
The get_new_key_pair() method is called from the RouteHandler in order to generate a key pair for a new agent. It returns the public key and private key as hex so they can be stored.
Building the Transaction: RouteHandler
After Messenger generates keys, the RouteHandler calls send_create_agent_transaction(). This method generates a transaction signer based on the private key, uses the transaction_creation module to create the transaction and batch, and then sends the batch to the validator. The send_create_agent_transaction method is defined in rest_api/simple_supply_rest_api/messaging.py.
async def send_create_agent_transaction(self, private_key, name, timestamp):
transaction_signer = self._crypto_factory.new_signer(
secp256k1.Secp256k1PrivateKey.from_hex(private_key))
batch = transaction_creation.make_create_agent_transaction(
transaction_signer=transaction_signer,
batch_signer=self._batch_signer,
name=name,
timestamp=timestamp)
await self._send_and_wait_for_commit(batch)
The make_create_agent_transaction() method creates a MakeCreateAgent transaction, and then wraps it in a batch.
Building the Transaction: make_create_agent_transaction
The make_create_agent_transaction function does two things:
- First, it creates the inputs and outputs for the transaction: the state addresses where a transaction processor is allowed to read or write during the execution of the transaction. In this case, the transaction processor only writes to or reads from the address of the agent.
- Next, it creates the payload and serializes it to bytes.
This function is defined in rest_api/simple_supply_rest_api/transaction_creation.py.
def make_create_agent_transaction(transaction_signer, batch_signer, name, timestamp):
agent_address = addresser.get_agent_address(
transaction_signer.get_public_key().as_hex())
inputs = [agent_address]
outputs = [agent_address]
action = payload_pb2.CreateAgentAction(name=name)
payload = payload_pb2.SimpleSupplyPayload(
action=payload_pb2.SimpleSupplyPayload.CREATE_AGENT,
create_agent=action,
timestamp=timestamp)
payload_bytes = payload.SerializeToString()
return _make_batch(
payload_bytes=payload_bytes,
inputs=inputs,
outputs=outputs,
transaction_signer=transaction_signer,
batch_signer=batch_signer)
Building the Transaction: _make_batch
Next, _make_batch creates the transaction object and wraps it in a batch. See the code in rest_api/simple_supply_rest_api/transaction_creation.py.
def _make_batch(payload_bytes, inputs, outputs, transaction_signer, batch_signer):
transaction_header = transaction_pb2.TransactionHeader(
family_name=addresser.FAMILY_NAME,
family_version=addresser.FAMILY_VERSION,
inputs=inputs,
outputs=outputs,
signer_public_key=transaction_signer.get_public_key().as_hex(),
batcher_public_key=batch_signer.get_public_key().as_hex(),
dependencies=[],
payload_sha512=hashlib.sha512(payload_bytes).hexdigest())
transaction_header_bytes = transaction_header.SerializeToString()
transaction = transaction_pb2.Transaction(
header=transaction_header_bytes,
header_signature=transaction_signer.sign(transaction_header_bytes),
payload=payload_bytes)
batch_header = batch_pb2.BatchHeader(
signer_public_key=batch_signer.get_public_key().as_hex(),
transaction_ids=[transaction.header_signature])
batch_header_bytes = batch_header.SerializeToString()
batch = batch_pb2.Batch(
header=batch_header_bytes,
header_signature=batch_signer.sign(batch_header_bytes),
transactions=[transaction])
return batch
Building the Transaction: _send_and_wait_for_commit
Finally, _send_and_wait_for_commit wraps the batch in a ClientBatchSubmitRequest and sends it to the validator. The batch can be referenced by its header signature, which allows us to query for its status. See rest_api/simple_supply_rest_api/messaging.py.
async def _send_and_wait_for_commit(self, batch):
# Send transaction to validator
submit_request = client_batch_submit_pb2.ClientBatchSubmitRequest(batches=[batch])
await self._connection.send(
validator_pb2.Message.CLIENT_BATCH_SUBMIT_REQUEST,
submit_request.SerializeToString())
# Send status request to validator
batch_id = batch.header_signature
status_request = client_batch_submit_pb2.ClientBatchStatusRequest(batch_ids=[batch_id], wait=True)
validator_response = await self._connection.send(
validator_pb2.Message.CLIENT_BATCH_STATUS_REQUEST,
status_request.SerializeToString())
# Parse response
status_response = client_batch_submit_pb2.ClientBatchStatusResponse()
status_response.ParseFromString(validator_response.content)
status = status_response.batch_statuses[0].status
if status == client_batch_submit_pb2.ClientBatchStatus.INVALID:
error = status_response.batch_statuses[0].invalid_transactions[0]
raise ApiBadRequest(error.message)
elif status == client_batch_submit_pb2.ClientBatchStatus.PENDING:
raise ApiInternalError(‘Transaction submitted but timed out’)
elif status == client_batch_submit_pb2.ClientBatchStatus.UNKNOWN:
raise ApiInternalError(‘Something went wrong. Try again later’)
Creating the Event Subscriber
The previous sections showed how to use Sawtooth’s client signing and transaction processor SDKs to submit and handle transactions. Next, you will learn how to read data from the blockchain. Although a client can fetch data directly from the validator, Simple Supply uses a slightly more sophisticated method in order to make fetching data easy and as fast as possible. This method uses an event subscription client that subscribes to Sawtooth state delta and block commit events. Sawtooth sends these events whenever the validator’s state database is updated.
The events contain the raw state data at the updated addresses. The event subscription client processes the event data and uses it to update the reporting database, an off-chain copy of blockchain state. The REST API can query this database when a client needs to get information from the blockchain. This local reporting database allows rapid querying of state data.
If you choose to implement or use a REST API to facilitate communication between the client and validator, you must define the RESTful interfaces for fetching data from the blockchain state and submitting updates to the blockchain. See protos/events.proto for the Sawtooth event-related protobuf messages, such as Event and EventFilter protobuf messages.
Event Subscription Client Operation
An event subscription client should operate in the following way:
- The client establishes a connection to the validator using the Sawtooth SDK’s Stream class.
- The client constructs EventSubscription objects that specify the event type that it wants to receive from the validator, with filters to fine-tune the selection.
Note: For a state-delta subscription, the client should subscribe to both sawtooth/block-commit and sawtooth/state-delta events, using a filter to specify the application namespace. - The client wraps the EventSubscription objects in a ClientEventsSubscribeRequest, along with the last known block IDs, and sends it to the validator.
Note: For the first event subscription, send a null block ID in the known_ids field to request events for all state updates (starting with the genesis block). - After successfully subscribing, the client should listen for incoming events.
- When the client receives an event, it checks whether the incoming block represents a fork or a duplicate block:
– If the block is a duplicate, no additional processing is needed
– If the block represents a fork, the client should update the reporting database as necessary. - After resolving a possible fork, the client transforms raw state data from the event to application-specific objects. A later topic has more details on this step.
- Existing records for application-specific objects are updated as “ended” and new records are inserted as “started” at the new block’s block number.
Storage Schemas for the Reporting Database
A reporting database can have three types of tables:
- A blocks table
- State object tables that are specific to the application
- Other application-specific tables for storing off-chain application information (such as user information and keys).
Updates to the block and state tables should happen atomically, within a single database transaction. This ensures that the block change and all the state changes remain consistent with the state of the validator network.
Storage Schemas for the Reporting Database: Blocks Table
The blocks table is a history of the block numbers and IDs in the blockchain. This table is used for fork resolution to compare the block number of a received event against its state root hash (the block ID). The blocks table should have the following schema:
CREATE TABLE blocks (
block_num bigint PRIMARY KEY,
block_id varchar
);
This example is for a PostgreSQL database, but it could be adapted to a different database.
Storage Schemas for the Reporting Database: Application Tables
Storage schemas for the state object tables define a pattern for managing the data for a particular application. These tables should follow the guidelines of Type 2 Slowly Changing Dimensions. In this case, there should be three additional columns for each table row: start_block_num and end_block_num, and a unique id.
The start_block_num and end_block_num columns specify the range in which that state value is set or exists. Values that are valid as of the current block have end_block_num set to NULL or MAX_INTEGER.
Because there might be state objects in the database that refer to the same object in state at different block heights (with different block numbers), the primary key for each object cannot be the same as the object’s natural key in blockchain state. Instead, use a sequence ID column or another unique ID scheme as the primary key. For better query performance, we recommend creating indexes on the natural key of the entry and the end_block_num.
For example, the table for state entries in the IntegerKey application (a simple Sawtooth application) could look like this:
CREATE TABLE integer_key (
id bigserial PRIMARY_KEY,
intkey_name varchar(256),
intkey_value integer,
start_block_num integer,
end_block_num integer,
);
CREATE INDEX integer_key_key_block_num_idx
ON integer_key (intkey_name, end_block_num NULLS FIRST);
Fork Resolution
When the event subscription client receives a new event, it must determine if the data represents a duplicate block, a fork, or new data that can be added to the reporting database normally. The event subscription client follows these steps:
- Query for the received block’s block_num in the blocks table
- If a block with the same block_num already exists in the blocks database, the received block is either a duplicate or represents a fork. The client continues with these steps:
– Compare the block_id of the new block to the existing block
– If the block IDs match, they represent the same state, so the block is a duplicate. The client can stop processing this event. In this case, the client doesn’t update the reporting database because the information is already there
– If the block IDs are different, the client has detected a fork.
In the case of a fork, the event subscription client must drop the previous fork’s data from the reporting database. The following pseudocode represents that process:
resolve_fork(existing_block):
for table in domain_tables:
delete from table where start_block_num >= existing_block.block_num
update table set end_block_num = null
where end_block_num >= existing_block.block_num
delete from block where block_num >= existing_block.block_num
After resolving the fork, the client updates the reporting database with the state data contained in the event.
Creating the Reporting Database
Before creating the event subscriber component, you need to create a storage schema for the reporting database. The previous topics described the general schema and tables. The Simple Supply reporting database looks like this:
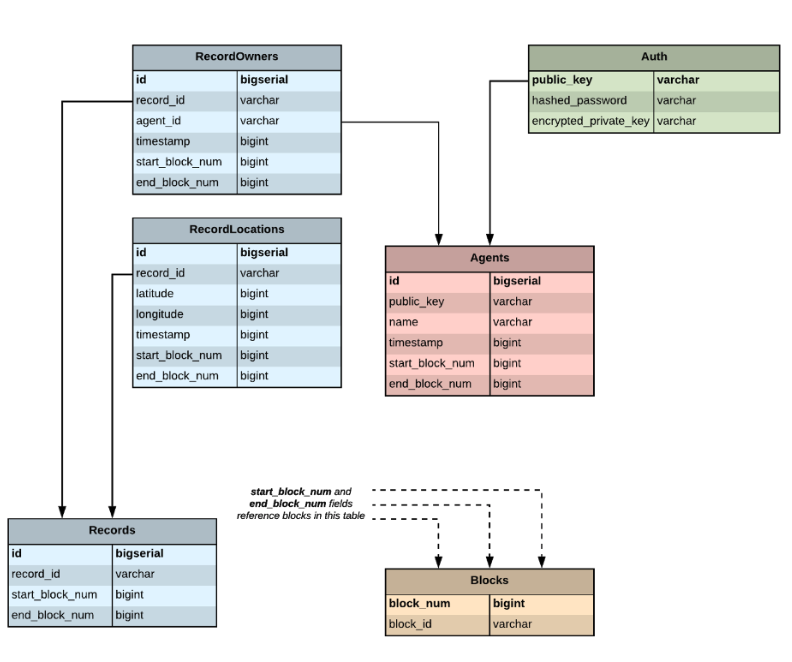
Retrieved from the Hyperledger’s GitHub
Simple Supply implements this database using PostgreSQL. The tables are created in the subscriber’s Database object when the component starts up.
Constructing the Subscriptions
After defining the schema for the reporting database, start constructing the event subscription. First, create EventSubscription objects for each event type to receive, sawtooth/block-commit and sawtooth/state-delta. See subscriber/simple_supply_subscriber/subscriber.py.
block_sub = EventSubscription(event_type=’sawtooth/block-commit’)
delta_sub = EventSubscription(
event_type=’sawtooth/state-delta’,
filters=[EventFilter(
key=’address’,
match_string=’^{}.*’.format(NAMESPACE),
filter_type=EventFilter.REGEX_ANY)])
For the block subscription object, the subscriber wants to receive any block that comes in. However, for the state delta subscription, it wants only the events with Simple Supply data, so the subscription uses an EventFilter with a regular expression to filter for events in the Simple Supply namespace. For more information, see the “About Event Subscriptions” section in the Sawtooth Documentation.
Submitting the Event Subscription Request
After constructing the EventSubscription objects that are wanted, the subscriber wraps them in a ClientEventsSubscribeRequest and sends it to the validator. The validator’s response is parsed and any errors with the event subscription request are handled. See subscriber/simple_supply_subscriber/subscriber.py.
# …
request = ClientEventsSubscribeRequest(
last_known_block_ids=known_ids,
subscriptions=[block_sub, delta_sub])
response_future = self._stream.send(
Message.CLIENT_EVENTS_SUBSCRIBE_REQUEST,
request.SerializeToString())
response = ClientEventsSubscribeResponse()
response.ParseFromString(response_future.result().content)
# …
self._is_active = True
# …
In this case, the last_known_block_ids field is set to [‘0000000000000000’], which is the null block ID. This tells the validator that you want to get events for all state updates, starting with the genesis block.
To re-subscribe to events when the reporting database already contains state data, you request “event catch-up” by sending a list of known block IDs (from the blocks table in the reporting database) so that the validator knows where to start when sending state events.
Listening for Events
After successfully subscribing to events, the event subscription client listens for incoming events. Events are received by subscription clients as an EventList.
For convenience, Simple Supply uses an event_handling module to separate event handling from subscription and listening functionality.
# …
while self._is_active:
message_future = self._stream.receive()
event_list = EventList()
event_list.ParseFromString(message_future.result().content)
for handler in self._event_handlers:
handler(event_list.events)
Handling Events
Each event handler is called with a reference to a Database object that manages the connection to the reporting database. Each time an event is received, the client follows the process described in “Event Subscription Client Operation”.
- If a fork is detected, call Database’s drop_fork method.
- Otherwise, parse the data contained in the events and update the database.
See subscriber/simple_supply_subscriber/event_handling.py.
def _handle_events(database, events):
block_num, block_id = _parse_new_block(events)
try:
is_duplicate = _resolve_if_forked(database, block_num, block_id)
if not is_duplicate:
_apply_state_changes(database, events, block_num, block_id)
database.commit()
except psycopg2.DatabaseError as err:
LOGGER.exception(‘Unable to handle event: %s’, err)
database.rollback()
As explained above, each update should be handled as a single database transaction. Once you start making database updates in _apply_state_changes, a transaction is created. After exiting the function, call database.commit() to finalize the transaction, or call database.rollback() to cancel the transaction entirely if there were any errors.
To apply the state changes to the reporting database, first parse the changes into a StateChangeList, which gives the address and value for each change. Next, determine the type of object that is contained in the event: examine the address (see “Addressing” in the Simple Supply specification document), then use the address to deserialize the state data into an object. See subscriber/simple_supply_subscriber/event_handling.py.
def _apply_state_changes(database, events, block_num, block_id):
changes = _parse_state_changes(events)
for change in changes:
data_type, resources = deserialize_data(change.address, change.value)
database.insert_block({‘block_num’: block_num, ‘block_id’: block_id})
if data_type == AddressSpace.AGENT:
_apply_agent_change(database, block_num, resources)
if data_type == AddressSpace.RECORD:
_apply_record_change(database, block_num, resources)
else:
LOGGER.warning(‘Unsupported data type: %s’, data_type)
Finally, insert the deserialized state objects into the database. See subscriber/simple_supply_subscriber/event_handling.py.
def _apply_agent_change(database, block_num, agents):
for agent in agents:
agent[‘start_block_num’] = block_num
agent[‘end_block_num’] = MAX_BLOCK_NUMBER
database.insert_agent(agent)
Updating the Database
The Database class handles the logic of managing the start_block_num and end_block_num fields. If there is already a resource with that natural key, we update its end_block_num with the current block. See subscriber/simple_supply_subscriber/database.py.
def insert_agent(self, agent_dict):
update_agent = “””
UPDATE agents SET end_block_num = {} WHERE end_block_num = {} AND public_key = ‘{}’
“””.format(
agent_dict[‘start_block_num’],
agent_dict[‘end_block_num’],
agent_dict[‘public_key’])
insert_agent = “””
INSERT INTO agents (
public_key,
name,
timestamp,
start_block_num,
end_block_num)
VALUES (‘{}’, ‘{}’, ‘{}’, ‘{}’, ‘{}’);
“””.format(
agent_dict[‘public_key’],
agent_dict[‘name’],
agent_dict[‘timestamp’],
agent_dict[‘start_block_num’],
agent_dict[‘end_block_num’])
with self._conn.cursor() as cursor:
cursor.execute(update_agent)
cursor.execute(insert_agent)
Fetching from the Database
After the reporting database contains some event data, the client can make GET requests to the Simple Supply REST API, which will then query the database for the requested information. See rest_api/simple_supply_rest_api/database.py.
async def fetch_agent_resource(self, public_key):
fetch = “””
SELECT public_key, name, timestamp FROM agents
WHERE public_key='{0}’
AND ({1}) >= start_block_num
AND ({1}) < end_block_num;
“””.format(public_key, LATEST_BLOCK_NUM)
async with self._conn.cursor(cursor_factory=RealDictCursor) as cursor:
await cursor.execute(fetch)
return await cursor.fetchone()
The Simple Supply REST API can only fetch current state data from the reporting database. A more complex REST API could also query for previous state data by specifying the block height (block number). This feature might be required for an application that needs to return data that will be synchronized at a certain point. See Sawtooth Supply Chain and Sawtooth Marketplace on GitHub for examples of this functionality.
Testing the Application
The Simple Supply repository includes basic unit tests for this example application. To run them, navigate to the project’s root directory and enter this command:
$ ./bin/run-tests
This command uses a test docker-compose file that opens test containers for the unit texts, then shuts down the docker containers when the unit tests are done. Of course, your application should also include integration tests that include more complex functions such as sending queries to the REST API and receiving responses. For sample integration tests, see Sawtooth Marketplace.
Creating the Client
As discussed earlier, the Simple Supply application uses the server-signing model. This means that any client application that uses the Simple Supply REST API is not in charge of creating or signing transactions. Instead, any HTTP client (such as Postman or cURL) can submit transactions or fetch data by sending requests to the Simple Supply REST API.
Because Simple Supply is intended as a general-use application, where the entities involved are generic agents and records, you could add a domain-specific client to this application platform.
As an example, the Simple Supply repository includes a basic web app called Curator. This app can be used to track the provenance of artwork as it is transferred from different museums or collectors. In this case, records are used to represent works of art, and agents represent museums or collectors own or exhibit the artwork.
The next chapter describes how to use Curator and shows how the log messages let you monitor the on-chain and off-chain activity of the client, REST API, transaction processor, and Sawtooth validator.
Summary
This chapter walked you through the implementation details of the example Simple Supply application, which demonstrated the important concepts of Sawtooth application development.
The next chapter shows how to run Simple Supply and examine the log output. It also describes basic application troubleshooting.
Veit Langenbucher Musical Clock with Spinet and Organ (interior view)
Metropolitan Museum of Art
Retrieved from the Hyperledger’s GitHub
Chapter 5. Running the Simple Supply Application
Introduction and Learning Objectives
This chapter describes how to put everything together by running the Simple Supply application. Although the client web app is a very basic interface, this chapter explains how the log messages show important indicators of your application’s behavior.
By the end of this chapter, you should be able to:
- Discuss about the Sawtooth Simple Supply environment
- Start Sawtooth Simple Supply with Docker
- Use the Curator web application
- Troubleshoot the Simple Supply application
- Shut down the Sawtooth environment.
About the Sawtooth Simple Supply Environment
The test environment for Sawtooth Simple Supply is a single Sawtooth node with a validator and all application components. This environment uses Docker containers for each component.
Prerequisites
This environment requires both Docker Engine and Docker Compose. Make sure that the docker and docker-compose commands are available on your machine. If you have not cloned the Simple Supply repository yet, see “Cloning the Simple Supply Repository” section in the previous chapter.
Starting Sawtooth Simple Supply with Docker
The Sawtooth Simple Supply repository has a docker-compose.yaml file that starts all the Sawtooth and application components.
To start Sawtooth and run the Simple Supply application:
- Open a terminal window and navigate to the project’s root directory (for example, ~/education-sawtooth-simple-supply).
- Run this command:
$ docker-compose up
This command downloads the Docker images for the Sawtooth environment, then starts all Sawtooth and Simple Supply components in separate containers. Downloading the Docker images and building the Simple Supply application can take several minutes. When the log messages stop, the Sawtooth environment is ready. - Keep the terminal window open. You will notice many log messages from all Sawtooth and application components.
Note: If you want to stop the containers but keep the data, enter CTRL+C in this terminal window. Later, you can run docker-compose up to start the same containers again. To completely stop the Sawtooth environment, and remove all containers and data, see “Shutting Down the Sawtooth Environment” section later in this chapter.
About the Docker Containers
The compose file defines the following containers. Note the HTTP endpoints for the Simple Supply client, the Simple Supply REST API, and the PostgreSQL Admin panel.
Component | Container Name | HTTP Endpoint | Description |
| Shell | simple-supply-shell | Shell for running Sawtooth commands | |
| Client | curator-app | http://localhost:8040 | Curator web app (the client front-end) |
| Simple Supply transaction processor | simple-supply-tp | Simple Supply business logic | |
| Simple Supply REST API | simple-supply-rest-api | http://localhost:8000 | Communication between client and transaction processor via HTTP/JSON |
| Validator | sawtooth-validator | Validator for blocks and transactions | |
| Consensus engine | sawtooth-devmode-engine-rust-default | Dev mode consensus engine (for development use only) | |
| Setting transaction processor | sawtooth-settings-tp | Built-in Sawtooth transaction processor for on-chain settings | |
| Event subscriber | simple-supply-subscriber | Listens to Sawtooth events | |
| PostgreSQL database | simple-supply-postgres | PostgreSQL reporting database | |
| PostgreSQL Adminer | simple-supply-adminer | http://localhost:8080 | PostgreSQL admin tool for viewing data in the reporting database |
The compose file also starts a Sawtooth REST API with the HTTP endpoint http://localhost:8008.
Watching the Log Messages
When you first start the Sawtooth environment, the end of the log output shows startup messages from the Sawtooth and Simple Supply components.
For example, the initial log output shows when the event subscriber (simple-supply-subscriber) starts and connects to the reporting database, creates tables, and then disconnects from the database.
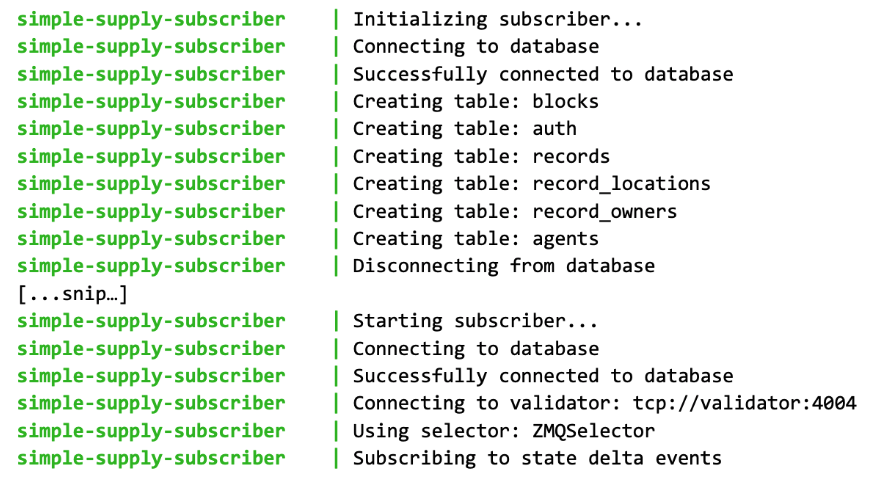
Retrieved from the Hyperledger’s GitHub
As you use the Curator web app, watch the log messages in this terminal window. These log messages will show interesting activity for Simple Supply components, including state changes to the blockchain.
Using the Curator Web App
In this procedure, you will use the Curator web app to record the transfer of a 14th-century hanging scroll, Poem in Chinese about Sugar, from the Metropolitan Museum of Art in New York City to the J. Paul Getty museum in Los Angeles for a future exhibition, “The Art of Cooking”. You will create a Met museum agent and register the artwork, then create an agent for the Getty. Finally, you will update the scroll’s location and transfer ownership to the other agent to record how it makes its way across the country.
Although this Curator web app is extremely simple, it demonstrates the underlying functionality of the Simple Supply application and how its components work together to make changes on the blockchain.
To get started, use a browser on your system to navigate to the Curator client’s endpoint, http://localhost:8040.
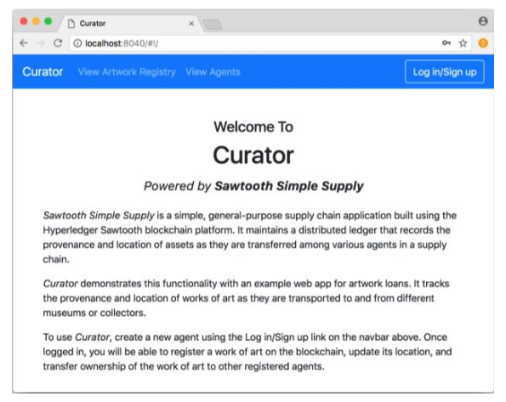
Creating the First Agent
To create the first agent (the artwork owner), click Log in/Sign up. On the next page, click create a new agent.

Enter a name and password, then click Create Agent. If the operation is successful, the client returns you to the Welcome page.
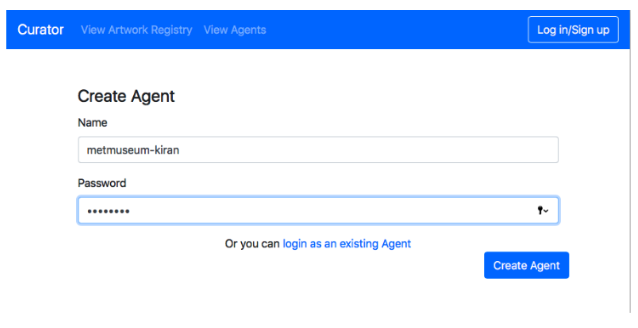
Creating the First Agent: Simple Supply Log Messages
In the terminal window, the log messages show that the transaction is validated, then committed.
For example, the following message is displayed when a block-commit event is broadcasted after the block is committed.

Later in the output, other log messages show the REST API creating the auth entry in the reporting database.

Viewing the Agent List
Click View Agents to see the new agent.

Note: Simple Supply identifies agents by public key, not user name, so you must enter a public key to log in and to transfer artwork to a different agent. If you forget a public key, go to this View Agents screen to see all agents’ public keys.
In the terminal window, you can see the log messages where Curator sends the request and the REST API returns the information.

Registering Artwork
Next, register a new work of art. Click Register Artwork, then enter a unique ID and the artwork’s location as decimal latitude and longitude values. The Metropolitan Museum of Art is at latitude 40.7795457, longitude -73.962916.
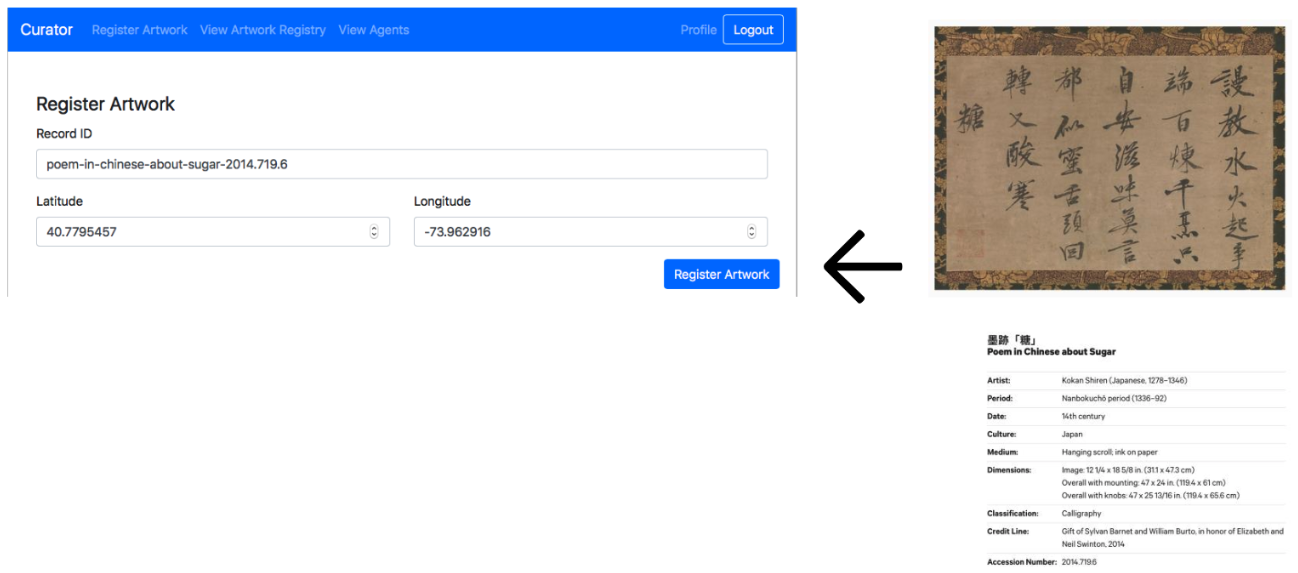
Simple Supply checks that the artwork ID is unique. As before, the log messages show the transaction being processed and the block being committed, then the REST API requests artwork information.
Viewing Artwork Details
After you register new artwork, Curator displays the Artwork Registry screen. You can click the artwork ID to display the details.
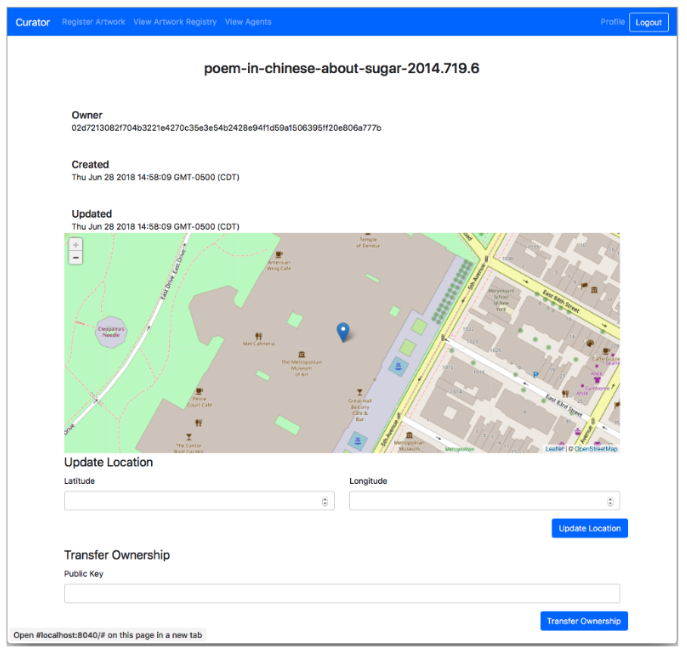
Creating the Second Agent
Now, create the second agent for the other museum:
- Open another browser window in incognito or private mode so that you don’t have to log out from the first Curator session (this is a simple way to pretend that you’re a different person using a separate system)
- Navigate to http://localhost:8040
- Click Log in/Sign up, then click create a new agent on the next page
- Enter a new agent name and password.
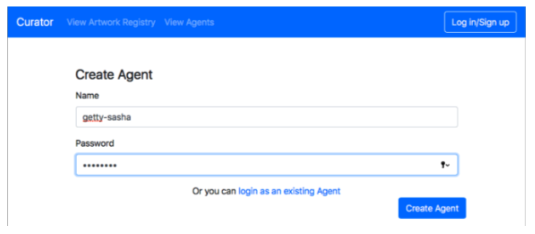
You are now logged in as the second agent. Click View Agents to see the updated list. In the terminal window, the log messages are similar to those for the first agent.

Transferring the Artwork
First, copy the recipient’s public key. From the View Agent screen, copy the second agent’s public key. You can do this in either browser window.

In the first agent’s browser window, go to the artwork details page. Click View Artwork Registry, then click the artwork ID. On the details screen, scroll down to Transfer Ownership at the bottom of the page.
In the Public Key field, paste in the the second agent’s public key, then click Transfer Ownership.
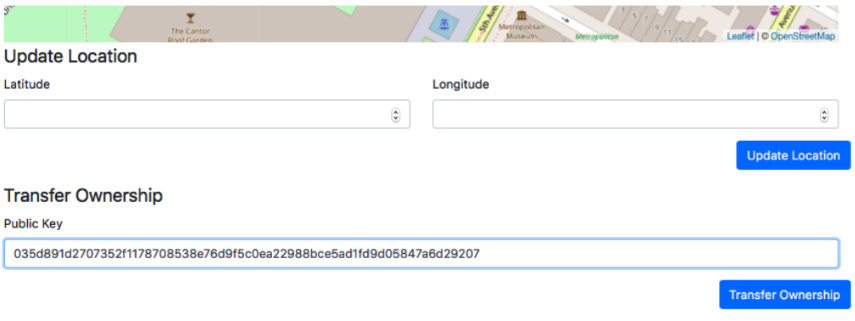
Refresh the browser window to see the ownership change at the top of this window.
Changing the Location
Finally, the second agent (who is now the owner of the artwork), can change the artwork’s latitude and longitude to its new location.
In the second agent’s browser window, go to the artwork details page and click View Artwork Registry, then click the artwork ID
On the details screen, scroll down to Update location at the bottom of the page
Enter the new location (the J. Paul Getty Museum is at latitude 34.0450085 and longitude -118.5650826).
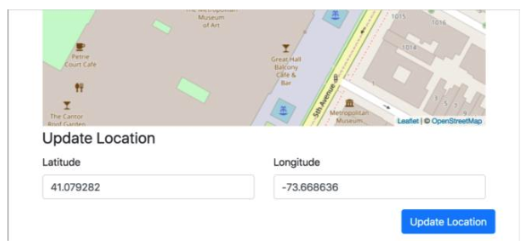
Refresh the browser window to see the location change.
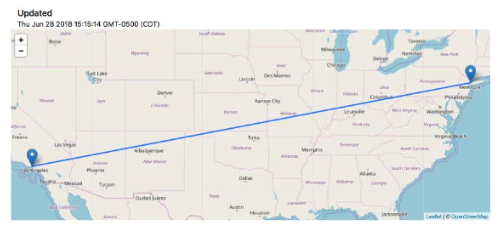
Troubleshooting
This section contains general tips for common problems with this procedure.
- Do you see unexpected Docker errors when you start up the Sawtooth environment? If so, be sure to start with a clean Docker environment. For more information, see “Shutting Down the Sawtooth Environment” page later in this chapter.
- If there are problems with user information or event data in the reporting database, you can use the PostgreSQL Adminer to examine the data. The next topic shows how to connect and log in.
- Look at the Sawtooth logs to verify that the required components are running and communicating properly. For example:
– Is the Simple Supply transaction processor running?
– Did the transaction processor succeed in registering with the validator?
– Are the expected blocks of transactions being committed to the blockchain?
The following topics describe how to view the Sawtooth logs.

Franz Xaver Messerschmidt, The Vexed Man
J. Paul Getty Museum
Digital image courtesy of the Getty’s Open Content Program
Retrieved from the Hyperledger’s GitHub
Troubleshooting: Using the PostgreSQL Adminer with the Reporting Database
The compose file includes a container for PostgreSQL Adminer, which is a tool you can use to view data in the reporting database.
In a browser, go to http://localhost:8080 and use the following settings:
- System: PostgreSQL
- Server: postgres
- Username: sawtooth
- Password: sawtooth
- Database: simple-supply
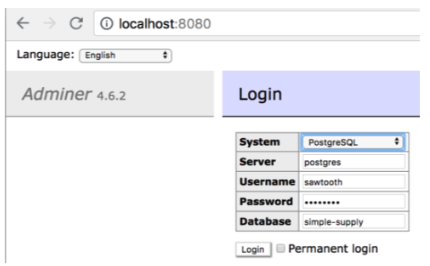
After you log in, you see the schema page for the reporting database.
Use the menu on the left to select agents, blocks, record owners, or other information in the reporting database.

See Adminer’s website or adminer Docker Documentation for information on using Adminer.
Troubleshooting: Examining the Sawtooth Logs
The Sawtooth logs often contain useful information for troubleshooting problems with an application or the Sawtooth environment.
- You can view the log files for any a Docker container with the command: docker logs {CONTAINER}. For example, use the following command to see the log for the Simple Supply transaction processor:
$ docker logs simple-supply-tp
See the docker compose file or the topic “About the Docker Containers” for the list of container names. - You can also connect to a container to look at the log files for that component. By default, Sawtooth log files are stored in the directory /var/log/sawtooth. Each Sawtooth component has both a debug log and an error log. For example, the validator has these log files:
/var/log/sawtooth/validator-debug.log
/var/log/sawtooth/validator-error.log
For more information, see “Examine Sawtooth Logs” and “Log Configuration” in the Sawtooth Documentation.
- You can view the log files for any a Docker container with the command: docker logs {CONTAINER}. For example, use the following command to see the log for the Simple Supply transaction processor:
Even if the problem isn’t obvious, the Sawtooth community might be able to help. Try to collect all relevant log information before asking for help.
Deploying and Testing: Shutting Down the Sawtooth Environment
To temporarily stop the Docker containers but keep the Sawtooth environment and all data, enter CTRL+C in the same terminal window where you started the Sawtooth environment. You can run docker-compose up to start the same containers again.
When you’re done with this Sawtooth environment, or if you want to clear everything and start again, you must do a clean shutdown.
First, enter CTRL+C in the same terminal window where you started the Sawtooth environment, then wait for all containers to stop.
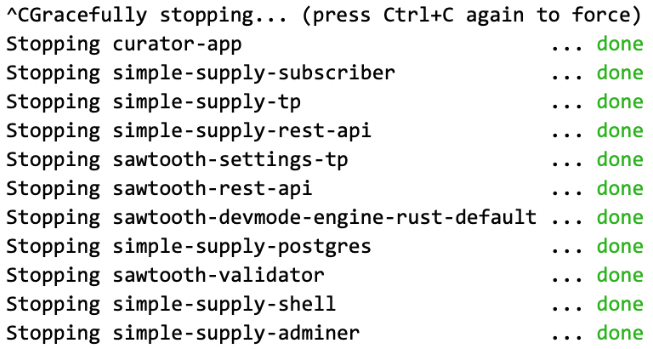
Next, run the following command to remove the Sawtooth environment (containers and all data):

Summary
Now that you have gone through the Sawtooth Simple Supply code and have successfully run the application, it’s time to celebrate!
Paestan Red-Figure Fish Plate
J. Paul Getty Museum
Digital image courtesy of the Getty’s Open Content Program
Retrieved from the Hyperledger’s GitHub
Of course, Sawtooth Simple Supply isn’t as complex as an actual proof-of-concept or production application. This course has explained the basics of application development for Hyperledger Sawtooth, but you’ll probably want to go on to develop a fully featured application. The last chapter in this course lists helpful resources for advanced application development.
Chapter 6. Course Conclusion
Summary
In this course, you learned these important concepts for Sawtooth application development:
- Blockchain basics
- Features of the Hyperledger Sawtooth enterprise blockchain platform, including the separation of core-level and application-level functionality that allows an application’s business logic to be handled by a client front-end and a transaction processor (the equivalent of a smart contract) that runs on the validator node
- How to design and create a distributed application for the Hyperledger Sawtooth enterprise blockchain platform
- A detailed walk-through of a basic application, Sawtooth Simple Supply, that demonstrated how to use the Sawtooth SDKs to create an application with a web front-end, a transaction processor for the blockchain business logic, and a custom REST API for communication
- How to run the Sawtooth Simple Supply application and understand its log messages.
Additional Resources and References
Learn about Sawtooth application development:
- “Application Developer’s Guide” from the Sawtooth Documentation
- “Hyperledger Sawtooth – Introductory Tutorial” by rahulr92’s (article on WordPress)
- “Understanding Hyperledger Sawtooth — Proof of Elapsed Time” by Keenan Rilee’s (article on Medium.com).
See example Sawtooth applications:
Join the Sawtooth development community:
- Hyperledger Sawtooth project page: links to code, documentation, examples, and latest news
- #sawtooth: Hyperledger Sawtooth channel for general discussions and questions
- Hyperledger Sawtooth mailing list.

Thank you for this post. Its very inspiring.